This lab builds on top of the previous RISC-V to ARM ALU
translation lab. Though a correct solution to the previous lab is
not necessary to complete this one, a correct
translateALU function can help facilitate testing. You
are expected to use your own translateALU: a correct solution will
not be provided. Additionally, a working RISCVtoARM_ALU function
could provide basic scaffolding for the task of translating branch
offsets.
The task in this lab is to write a translator for branch
instructions and unconditional register jump instructions from
RISC-V into ARM. Combine this new translator with the
translateALU function written in the previous lab
allows for the translation of a Turing-complete subset of RISC-V
instructions into ARM.

The CPSR, or status register, controls all conditional execution on the ARM instruction set and various execution modes of the CPU. The CPSR controls the mode of the CPU (kernel/user), interrupts, and is extensible for future functionality. The portion of the CPSR relevant to this lab are the uppermost 4 bits, collectively known as the condition-code flags.
Any data-processing instruction can update the condition-code
flags. To do so the Status bit of the instruction must
be set to 1. Then, after the instruction is executed,
the flags are set based on the result of the instruction as follows:
N Flag indicates the operation's result
is negative. Equal to bit 31 (sign bit) of the
result of the operation that was encoded to set it.Z Flag indicates that the result of the
instruction that set the flag was equal to 0.C Flag indicates if the result of an
addition is greater than or equal to 232, or if the
result of unsigned subtraction is negative. It is also altered
as a side effect of some shifts. This code is not used in this
lab, but is included for the sake of completeness.V Flag is similar to the C
flag but this one is for signed integers: it indicates signed
overflow during the operation that sets the flag. It is
meaningless for unsigned numbers and other data.Every instruction has a conditions field at the
beginning. These bits determine what state one or more of the
CPSR's condition code flags have to be in for the instruction to
execute.
CMP InstructionCPSR condition flags can be set by instructions whose
Status bit is set to one. See previous lab for
position of flag bits in instructions. Once the flags change,
they stay in the new state until altered again by another
instruction. RISC-V doesn't support the system of conditional
execution that ARM does, therefore the vast majority of these
instructions cannot realistically exist as translations from
RISC-V. For the translation, some of the instructions that set
CPSR's condition code flags must be implemented because the
ARM's system of branching depends on conditional execution of a
branch instruction.
In this lab, only the CMP instruction sets
condition code flags. CMP is a signed integer
subtraction instruction whose result is used to update the
CPSR's condition code flags but isn't stored anywhere. It is a
data-processing register instruction with opcode
1010 whose Rd register should be
encoded as 0 and whose status bit should be 1. The
encoding format is as shown here:

The table summary of CMP is as follows:
| Instruction | Opcode | Description |
| CMP | 1010 | subtraction of one register value from another (specifically Rn - Rm) and result is not written to a destination register |
There are 16 possible states for a given instruction's 4 condition bits. Only three of these states are used in this lab. The three, explained in the context of the CMP instruction, are as follows:
| Code | Flag Check | Meaning |
1110 | no check | always execute |
0000 | Z set | execute if result of flag-setting instruction was zero |
1010 | N equals V | execute if Rn was greater than or equal to Rm in CMP instruction that last set these flags |
Unlike RISC-V, ARM prefetches two instructions ahead during
execution, causing its PC to point to an address
2 word (8 bytes) ahead. For instance, when an instruction
whose address is 0x00000000 is being executed,
the PC holds the value
0x00000008. In ARM branch and jump instructions,
the immediate is added to the PC. Therefore, the
immediate value in such instructions is equal the address of
the destination instruction and the address of the branch
instruction minus 8.

Conditions (bits 31-28) these bits control
when the branch is taken. These bits are set by the execution of a
previous instruction. Bits 27-25 these 3 bits are another ARM
opcode. The opcode 101 uniquely identifies this to be a
branch instruction.Link (bit 24) The Link bit
determines whether the address of the next instruction (that is, the
one that follows this one immediately in memory, not the branch
target) should be stored in the link register,
R14. This value should be set to 0 for branch
instructions. Offset (bits 23-0) This offset is shifted
left 2 bits before being used to increment the program counter in
branching.CMP instruction and the branch
instruction itself, with its condition bits set based on the
type of RISC-V branch instruction being translated.Link bit should
be 0.
BX, or Branch Exchange jumps to the address stored
in the register specified in bits 3-0, i.e. places the contents of
the specified register into the PC.
BX instruction is used in this lab only to
implement an unconditional jump.jalr x0, rs, 0 instruction where rs is the
source register containing the destination address.jalr x0, rs, 0 into an appropriate
BX instruction.While there are significantly fewer instructions that must be implemented in this lab compared to the ALU part. However, in this lab you have to correctly translate RISC-V branch offsets into ARM branch offsets accounting for the fact that each RISC-V branch gets translated into two ARM instructions.
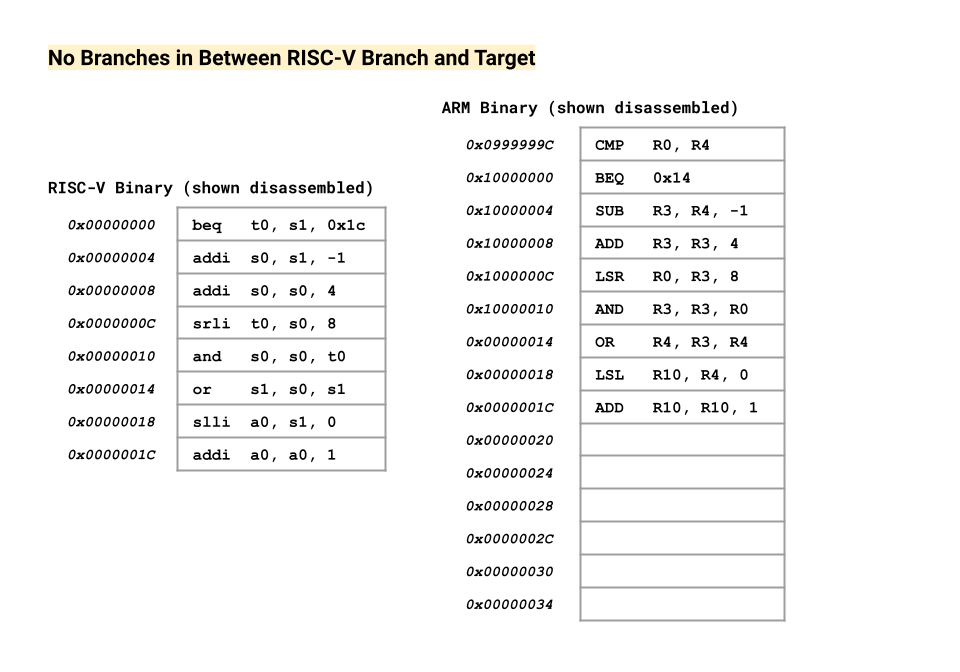
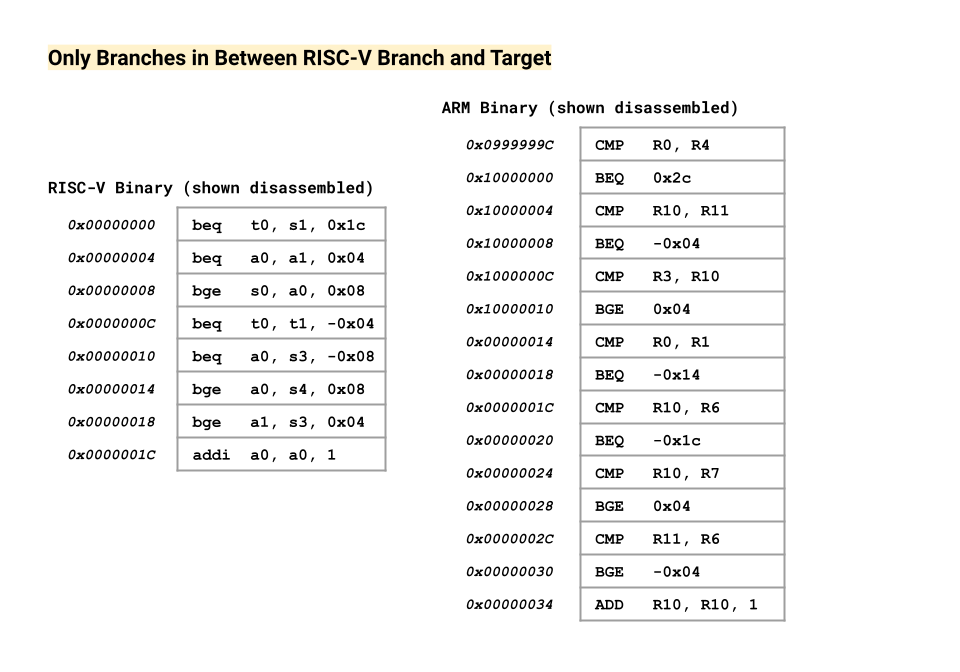
For example: suppose that there's a branch at address
0x00000000 in RISC-V and that is should be
translated to an ARM instruction at address
0x10000000. If the RISC-V branch's destination is
an instruction at address 0x0000001C, then the
same instruction translated into ARM would be at address
0x1000001C only if there were no branches
translated in between them; if there was a single additional
translated branch in between them the target instruction would
be at 0x10000020; if all instructions between
them were translated branches (that is, 6 translated
branches), then the target instruction would be at
0x10000034. To emphasize, these discrepancies are
due to a single RISC-V branch being translated into 2 ARM
instructions.
Here's a visual of the two most extreme cases described above:
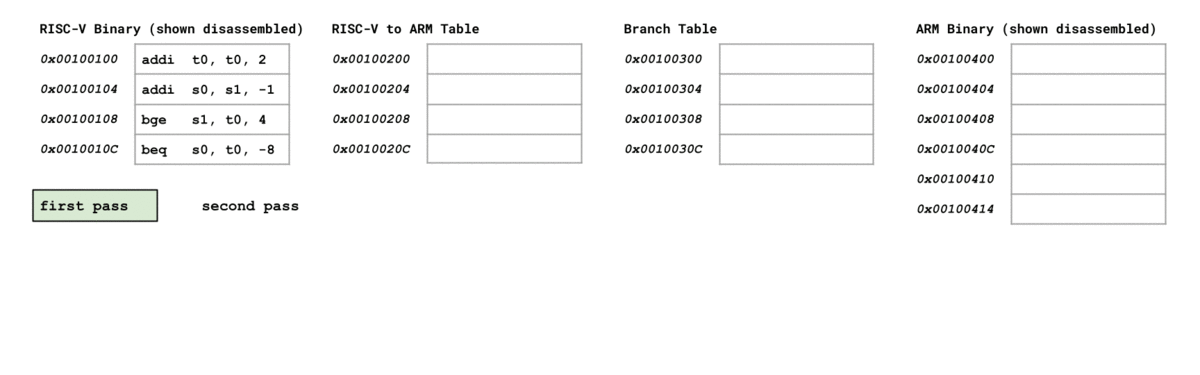
An algorithm is needed to compute the target address. One possibility, suggested below, is to go over the RISC-V code twice while using two tables to keep track of branch target addresses.
This algorithm requires the pointers to ARM and RISC-V instructions from the previous lab and works with the following two tables:
RAT and BTT are index correlated to the RISC-V instructions
stored in memory: the n-th entry RAT and n-th entry in BTT correspond
to the n-th RISC-V instruction in memory (i.e. all of these are at
4*n + base address in memory).
The first pass should be over RISC-V instructions. On this pass, for each instruction, you should:
CMP instruction instead of the
address of the branch instruction. In the second pass, for each row in the BTT:
CMP instruction
from RAT.ARM branch instruction address = CMP address + 0x4ARM Branch Offset = ARM branch target address - ARM branch instruction address - 0x8ARM Offset Field = ARM Branch Offset >> 2Here is a GIF illustrating the above approach:
If the GIF is too fast or too slow for your liking, feel free to download the PDF version that you can find in the Resources section.
Though the above is the recommended approach, feel free to implement a different one, provided that it allows you to implement branch translation correctly.
Your assignment is to correctly translate RISC-V's branches and
unconditional jump instructions, while utilizing the
translateALU function, imported from
arm_alu.s, to translsate ALU instructions.
The following are all of the new RISC-V instructions that this lab solution must
translate. Constraints are put on them to ensure
simple transition to ARM. In the encoding, s
specifies a source register, t a target register,
d a destination register and i an
immediate value.
| Instruction | Encoding | Type |
JALR d, imm(s) |
iiii iiii iiii ssss s000 dddd d110 0111 |
I |
BEQ s, t, offset |
imm[12|10:5]t tttt ssss s000 imm[4:1|11]110 0011 |
SB |
BGE s, t, offset |
imm[12|10:5]t tttt ssss s101 imm[4:1|11]110 0011 |
SB |
The jalr instruction's immediate doesn't get shifted:
the 12 bits are used as is.
To encode branches' source and target registers into
CMP instructions, source and target should be encoded
as Rn and Rm respectively.
jalr instruction will be used exclusively to
implement the unconditional jump. translateRegister
function could be helpful here). Markers will, however, use a
different arm_alu.s file than your own, so those
functions are expected to act preecisely according to the
specification. common.s file. import arm_alu.s cause an error
if compiled without any adjustments. To fix this, simply remove
the common.s import from the arm_alu.s
file tthat you are using. ecalls in your code for debugging
purposes, make sure to remove them before submitting your solution
because it may result in lost marks.You are required to implement the following functions:
RISCVtoARMa0 into ARM
code and stores that ARM code into the memory address found in
a1.
a0: pointer to memory containing a RISC-V
function. The end of the RISC-V instructions is marked by the
sentinel word 0xFFFFFFFF.a1: a pointer to preallocated memory where you
will have to write ARM instructions.a0: number of bytes worth of instructions
generated by RISCVtoARM.translateControlbeq, bge or
jalr instruction into either one or two ARM
instructions.
a0: untranslated RISC-V instruction.a0: first translated ARM instruction. This should
either be a wholly tanslated BX instruction, or a
CMP instruction.a1: 0 or second translated ARM instruction. When
non-zero, it should return a branch with 0 offset.calculateRISCVBranchOffseta0: RISC-V instruction.a0: branch offset
To obtain testing data, you can write short RISC-V programs using the subset of instructions provided, and convert them into binary files using the following command
rars "YOUR_RISCV_FILE" a dump .text Binary "YOUR_DESIRED_BINARY_FILE"
The provided common.s file
loads RISC-V binary from a file and generates
out.bin file after calling the functions specified
above. This commons.s file should be included in
your arm.s file. The program, starting in
arm.s, takes the name of the file containing the
test to load as an argument. Thus, it can be run using
rars arm.s pa RISCV_BINARY_FILE. The submitted
solution must not contain the common.s
attached. It also must not contain a main
function
This assignment provides the program ARMDisassembler.s that prints ARM instructions in a textual representation.
The disassembler indicates when the status bit is set by
adding an S after the instruction type
(e.g. ADD S R0, R1, R2), and indicates when a
non-shift data-processing register instruction has a shift by
appending
LL/LR/AR/RR
alongside the shift amount at the very end of the
instruction. Make sure to take all of this into account when
analyzing the output.
Otherwise, the disassembler is designed to print instructions that follow the specifications, producing question marks where no valid interpretation is possible. Though some are provided already, you are responsible for creating test cases to ensure compliance with the assignment specification. The program can be run using:
rars ARMDisassembler.s pa out.bin
To view the bytecode contents of the generated
out.bin files in a terminal, use the following
command:
hexdump out.bin
Here are some test cases you can use to test your program:
| RISC-V Program | RISC-V Binary | ARM Binary | ARM Text Representation |
| branchesAndJumps.s | branchesAndJumps.bin | branchesAndJumps.out | branchesAndJumps.txt |
| moreBranchesAndJumps.s | moreBranchesAndJumps.bin | moreBranchesAndJumps.out | moreBranchesAndJumps.txt |
| manyBranches.s | manyBranches.bin | manyBranches.out | manyBranches.txt |
This lab is supported
in CheckMyLab.
To get started, navigate to the ARM-ALU lab in CheckMyLab found in the
dashboard.
From there, students can upload test cases in the My test cases table.
Test cases are RISC-V binary files, generated as described in the
Testing section.
Additionally, students can upload their solution in the My solutions
table, which will then be tested against all other valid test cases.
To upload your solution, first zip your arm.s
and arm_alu.s files into a single archive.
For example:
zip solution.zip arm.s arm_alu.s
Then, upload the zip file as the solution in CheckMyLab.
More information about ARM instruction set encoding can be found here.
A PDF version of the branch table algorithm illustration can be found here.
Slides for this lab can be found here as a PDF and here as a PPTX.
Assignments too short to be adequately judged for code quality will be given a zero. Register translation is vital for all instructions. Therefore it is difficult for a binary translator that does not do correct register translation to pass ANY of the grading test cases. Please, ensure proper register translation according to the table above.
The file name should be arm.s and it should contain
only the code for the functions specified above. Make sure to not
include a main function in your solution. Do not
remove .include "common.s" from the top of your
solution. To submit, keep the arm.s file in the
Code directory of your submission repo, where the
latest commit (before the deadline) from the master branch will be
marked. Your solution also MUST include the CMPUT 229 Student
Submission License at the top of the file containing your
solution and you must include your name in the appropriate place
in the license text.