Created for the University of Alberta CMPUT 229 Computer Architecture course
Author: Austin Crapo, June 2017
Converted for RISC-V: Taylor Zowtuk, May 2019
GLIR is a collection of subroutines to emulate graphics and it is meant for use with the Xfce Terminal Emulator. GLIR can be run by using either RARS (master branch) or Freedom Studio (FreedomStudio branch). Although most UNIX-system terminals will work, the Xfce terminal was the only used for extensive testing during development (tests/examples also appear to work using GNOME Terminal). The true requirement is that the terminal emulator be DEC VT220 compliant. If the terminal emulator is not compliant GLIR subroutines will produce a bunch of garbled text. The purpose of GLIR is to abstract away the terminal escape sequences into an organized library that allows beginner assembly programmers to include visual elements in their work. GLIR has been modified from the original GLIM library to be used with the RISC-V ISA.
The source code for GLIR can be found at: https://github.com/cmput229/GLIR.
Some high-level library useage is presented here; for a list of all public subroutines and their useage/requirements, refer to GLIR's reference at: https://cmput229.github.io/GLIR/docs/reference.
GLIR is free to use, available under the MIT license. Attribution under this license is not required, but always appreciated.
GLIR requires a DEC VT220 compliant terminal and RARS (a RISC-V simulator) to run. On Ubuntu we can install an Xfce-terminal using the command sudo apt-get install xfce4-terminal. RARS requires at least Java 8 to run which we can install using the command sudo apt-get install default-jdk. Lastly, we can get RARS by going to the RARS github page and downloading the latest rars.jar release.
This session discusses how to start GLIR, the conceptual architecture, how the screen is updated, and support for colors.
Before you call any of the GLIR printing routines you must call the following routine:
jal ra, GLIR_Start
This helper subroutine resizes the screen (see input arguments), hides the cursor (which otherwise will interfere with printing), and clears the terminal to the default background color.
When your program finishes, and if you had started GLIR, then call the following:
jal ra, GLIR_End
GLIR_End undoes most changes so that the terminal window is not left unusable when your program exits. Unfortunately GLIR_End cannot resize the window back to its original size because at the moment there is no method to read and store the terminal size at the start of the program.
The main device in GLIR is the terminal window which contains a certain number of rows and columns. These are referred to throughout the documentation as Rows and Cols or (R, C).
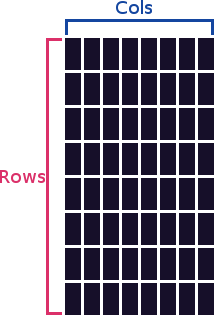
The tuple describing a position on the grid is (R, C) and not (C, R). Remember this. Terminals were designed to print text top to bottom, left to right. Their underlying control structures are built on this assumption. Thus the row number comes before the column number. The origin (0, 0) is at the top left of the terminal window:
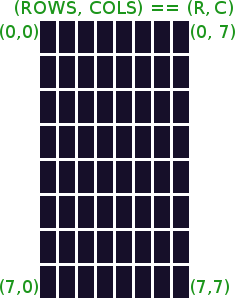
The screen above is a square grid, but terminals and fonts are not square (even if they are monospace), thus a square grid renders a rectangular shape.
The terminal display that you access with GLIR should be treated as a write-only persistent array. Thus, you can 'push' updates to the screen, but you cannot revert them, you cannot see if they were successful, and you cannot make decisions based on the screen state. Instead, the best method to use GLIR is to keep your own data structure representing the screen, then when a change needs to be made to that data structure, you can make a corresponding change in the screen by 'pushing' updates to it.
There are two main ways to handle the synchronization between your own data structure and GLIR. Depending on what you are trying to accomplish one will be preferable over the other, but the second is much better practice and more versatile.
This is the brute force method. Each time any updates need to happen, you clear the entire screen (using GLIR_ClearScreen). Then you iterate over your data structure and use GLIR_PrintString to print each element of the display again.
Drawbacks: less built-in subroutine color support, if you need to reprint too often or have too many elements that need printing your screen will flicker uncomfortably. This is because clearing the terminal is very slow (it only requires one command), but printing requires that about 20 characters be printed for each tile you need to print on the screen. A monitor however refreshes very fast. So your monitor is likely to refresh at least once after you have cleared, but before you are done printing all the elements, causing the flicker.
Advantage: quick to setup for testing purposes so you can focus on getting the underlying code working.
Resources: see the GLIR_ClearScreen and GLIR_PrintString subroutines.
This method focuses on calculating changes that need to be made to the screen, and then printing them. When your underlying data-structure representing the screen is changed, you add the changes to a list. When you have enough changes, or when you are finished calculations or ready to print, you then print all the updates at once, leaving the unchanged portions of the screen untouched. This can be important for things such as games or art, where you would rather have all the updates show at once or with as little delay between them as possible. There is a slight overhead in keeping track of this list, however, not nearly as much as clearing the whole screen and reprinting. Also, terminals themselves are slow to print so there's generally no way you can completely eliminate delay between the start and end of printing, but you can reduce it. GLIR has an included subroutine to assist with this concept for printing, that rolls together color printing in a simple 'batch job' format.
Advantages: less overhead, fewer updates, more built-in color support, potentially smoother animations
Resources: see the GLIR_BatchPrint subroutine.
Of course, there are other methods that can be designed using the individual subroutines and smart programming. Feel free to experiment. A hybrid approach might for example use GLIR_PrintString and GLIR_SetColor to achieve color printing and carefully be programmed to avoid reprinting too many tiles. It is left up to you how you use this library.
Support for colors in terminals has been around for a long time - but universal adoption is not yet a reality. For those terminals that do support it, different levels and standards have been adopted as the terminal emulators matured. Seven color terminals were upgraded to 256 color terminals and then to a 3-byte Red-Green-Blue (RGB) color generation. GLIR is designed to support 256-color terminals or above (3-byte RGB terminals will also work because they also support the 256-color codes). The Xfce4-terminal is a 256-color terminal. Below is a table that shows the supported color codes (see GLIR_SetColor or GLIR_BatchPrint for usage).
In GLIR you change terminal color settings (using GLIR_SetColor) in the same way that you print to the terminal. You may 'push' a color setting, but you cannot check what the current setting is. Future prints will be in the color set, past prints will not be affected. Therefore, part of GLIR_Start is to set the color to the defaults (default is based on your terminal defaults, which are usually white text on black background in Linux). The GLIR_RestoreSettings subroutine can be used to restore the default color settings.
The following table is extracted from wikipedia:
| 256-color mode — foreground: ESC[38;5;#m background: ESC[48;5;#m | |||||||||||||||||||||||||||||||||||||||||||||||||||||||||||
|---|---|---|---|---|---|---|---|---|---|---|---|---|---|---|---|---|---|---|---|---|---|---|---|---|---|---|---|---|---|---|---|---|---|---|---|---|---|---|---|---|---|---|---|---|---|---|---|---|---|---|---|---|---|---|---|---|---|---|---|
| Standard colors | High-intensity colors | ||||||||||||||||||||||||||||||||||||||||||||||||||||||||||
|
|||||||||||||||||||||||||||||||||||||||||||||||||||||||||||
| 216 colors | |||||||||||||||||||||||||||||||||||||||||||||||||||||||||||
| 16 | 17 | 18 | 19 | 20 | 21 | 22 | 23 | 24 | 25 | 26 | 27 | 28 | 29 | 30 | 31 | 32 | 33 | 34 | 35 | 36 | 37 | 38 | 39 | 40 | 41 | 42 | 43 | 44 | 45 | 46 | 47 | 48 | 49 | 50 | 51 | ||||||||||||||||||||||||
| 52 | 53 | 54 | 55 | 56 | 57 | 58 | 59 | 60 | 61 | 62 | 63 | 64 | 65 | 66 | 67 | 68 | 69 | 70 | 71 | 72 | 73 | 74 | 75 | 76 | 77 | 78 | 79 | 80 | 81 | 82 | 83 | 84 | 85 | 86 | 87 | ||||||||||||||||||||||||
| 88 | 89 | 90 | 91 | 92 | 93 | 94 | 95 | 96 | 97 | 98 | 99 | 100 | 101 | 102 | 103 | 104 | 105 | 106 | 107 | 108 | 109 | 110 | 111 | 112 | 113 | 114 | 115 | 116 | 117 | 118 | 119 | 120 | 121 | 122 | 123 | ||||||||||||||||||||||||
| 124 | 125 | 126 | 127 | 128 | 129 | 130 | 131 | 132 | 133 | 134 | 135 | 136 | 137 | 138 | 139 | 140 | 141 | 142 | 143 | 144 | 145 | 146 | 147 | 148 | 149 | 150 | 151 | 152 | 153 | 154 | 155 | 156 | 157 | 158 | 159 | ||||||||||||||||||||||||
| 160 | 161 | 162 | 163 | 164 | 165 | 166 | 167 | 168 | 169 | 170 | 171 | 172 | 173 | 174 | 175 | 176 | 177 | 178 | 179 | 180 | 181 | 182 | 183 | 184 | 185 | 186 | 187 | 188 | 189 | 190 | 191 | 192 | 193 | 194 | 195 | ||||||||||||||||||||||||
| 196 | 197 | 198 | 199 | 200 | 201 | 202 | 203 | 204 | 205 | 206 | 207 | 208 | 209 | 210 | 211 | 212 | 213 | 214 | 215 | 216 | 217 | 218 | 219 | 220 | 221 | 222 | 223 | 224 | 225 | 226 | 227 | 228 | 229 | 230 | 231 | ||||||||||||||||||||||||
| Grayscale colors | |||||||||||||||||||||||||||||||||||||||||||||||||||||||||||
|
|||||||||||||||||||||||||||||||||||||||||||||||||||||||||||
Demonstrations of the expected output of the tests/demos, which are included with this library, can be found at: https://cmput229.github.io/GLIR/Testing/testing.
If you create new subroutines or have any suggestions feel free to make a pull request and we will consider incorporating it. For any questions or problems with GLIR please create an issue on the repository. The purpose of GLIR is to abstract out the escape codes that move the cursor and change printing styles into a workable graphics package. Some terminal emulators allow more advanced capabilities that are not currently implemented in GLIR. Your terminal emulators' escape-code documentation contains information about such capabilities. A hint for those wanting to create animations or more pretty graphics - there is no character that can be printed that covers an entire grid space in most default fonts. The unicode 'full block' character █ makes for a great pixel element in most printing cases but leaves a sliver of space above and below but not side to side. If you find a square font where the full block covers, please let me know and I will look into including support for it in GLIR. A hacky method is to set the color of the background and print a space (" ") but this can effect GLIR_ClearScreen because it will set the entire screen to the current background color.
Thanks to: AustinGrey, TaylorZowtuk, zacharyselk, rmnattas, and mehrabmehdi for their contributions to GLIR!