CMPUT 229 - Computer Organization and Architecture I
Lab 4: Dungeon Crawler
Author: Sarah Thomson
Introduction
The solution for this lab uses keyboard and timer interrupts to create a dungeon-crawler game. The goal of this game is to move an agent from the start of the dungeon to the exit while surviving encounters with multiple hidden enemies and collecting all of the loot that is spread throughout the dungeon.
This lab aims to achieve the following objectives:
- Understand asynchronous execution through interrupt and exception handling.
- Understand Memory-Mapped IO (MMIO).
- Gain programming experience in RISC-V.
- Have fun creating a cool game.
Example Gameplay
The player moves the agent, shown as a @ character, using
the w (up), a (left), s (down),
and d (right) keys.
The bottom left corner shows the agent's health, and the bottom right corner
shows the time remaining.
Throughout the map, there is visible loot (L) characters.
When the agent encounters loot, the time remaining is increased.
Invisible enemies are hidden throughout the map.
The position of each enemy is fixed, enemies don't move throughout the map.
When the agent encounters an enemy, the enemy (E) appears on
the map, and the agent is stuck in place, losing one health point for each
second that it is stuck.
The player attacks the enemy by pressing the spacebar, after which the enemy
disappears and the agent stops taking health damage and becomes unstuck.
To win the game, the player must collect all of the loot and reach the end of the dungeon without loosing all health or running out of time. If the agent reaches the exit of the dungeon without collecting all the loot, the game does not end.
Interrupts
Exceptions and interrupts are two types of events that can disrupt a RISC-V program's execution. An exception is directly caused by the instructions a program is executing, such as an address out of range error. Interrupts are triggered by external sources and can occur at any point during program execution, such as a timer interrupt. When an interrupt or exception occurs, the normal flow of the program is paused, and control is transferred to an interrupt handler. A handler will perform any actions required by the interrupt or exception. After the handler completes its task, if it hasn’t terminated the program (as handlers often do in response to exceptions), the program's execution usually resumes at the instruction that was about to be executed when the interrupt or exception occurred. In some cases, control cannot safely be returned to the interrupted code after an exception. In such cases, the program is terminated. In this lab, you are concerned only with handling specific types of interrupts, and not exceptions.
Control and Status Registers
This lab uses external interrupts from hardware. The role of the following CSRs (Control and Status Registers) are important for the use of interrupts:
ustatus(User Status Register,CSR#0) is a 32-bit register that controls and manages user-level interrupts. To enable user-level interrupts set the 0th bit of this register to 1.uie(User-Interrupt Enable Register,CSR#4) is a 32-bit register that controls the types of interrupts that are enabled using a bitmask. Bits 4 and 8 are relevant for this lab. The 4th enables user-level timer interrupts. The 8th bit enables user-level external interrupts. These bits must be set to 1 to enable interrupts from the timer and the keyboard.utvec(User Trap-Vector Base-Address Register,CSR#5) is a 32-bit register that controls where interrupts are handled. The register holds the address of the interrupt handler that should be called when an interrupt or exception occurs.ucause(User Trap Cause Register,CSR#66) is a 32-bit register that identifiies which type of interrupt is being handled. After an exception or an interrupt, this register holds the interrupt/exception code to help identify its cause. An exception code is stored in the first 31 bits ofucauseand the last bit indicates whether it was an interrupt or an exception.uscratch(Temporary register to be used freely in the user trap handler,CSR#64) is described below.
These CSRs can be set by using the CSR instructions. For example, to enable
user-level interrupts in ustatus use "CSR Read/Write Immediate"
instruction: csrrwi zero, 0, 0x1. Or use pseudo-instructions to read
and write to the CSR registers. For example:
csrr    t0, 4     # read from CSR #4 to t0
csrw    t0, 6     # write from t0 to CSR #6
csrwi   0, 0x4    # write 0x4 to CSR #0
Saving Registers in the Interrupt Handler
When an interrupt is raised, the program is paused and control is
transferred to the interrupt handler.
The utvec register holds the address of the interrupt handler
that should be called when an interrupt or exception occurs.
An interrupt handler is analogous to a normal function but there are some
key differences.
An interrupt can occur at any time, therefore the handler must guarantee
that:
-
All registers are restored to their original values after the
handler finishes.
Thus, the handler must save any register that it uses (not just
the
sregisters) and the handler must restore the original values to these registers before returning. -
The instruction
uretmust be used to leave the interrupt handler instead of thejalrorretinstructions that are used to return from a normal function. - Functions exterior to the handler should not be called from within the handler.
To ensure that the program can safely resume execution after returning
from the handler, the registers used by the handler must be saved upon
entering the interrupt handler and restored before returning.
The registers cannot be saved using the stack pointer because the stack
pointer may be corrupted.
Therefore, in common.s we have allocated memory
labelled iTrapData where your handler may save registers.
In common.s we have also placed the address
of iTrapData into the uscratch register.
You can use the uscratch register and the csrrw
instruction to save and restore all the values of the registers used in
the handler.
The first and last instructions executed in the handler should
be csrrw a0, 64, a0, where a0 is chosen by
convention.
Here is some sample code that saves two registers and a0 in
the interrupt trap data:
handler:

# swap a0 and uscratch
csrrw   a0, 0x040, a0     # a0 <- Addr[iTrapData], uscratch <- PROGRAMa0

# save all used registers except a0
sw      t0, 0(a0)         # save PROGRAMt0
sw      s0, 4(a0)         # save PROGRAMs0

# save a0
csrr    t0, 0x040         # t0 <- PROGRAMa0
sw      t0, 8(a0)         # save PROGRAMa0

...
Non-re-entrant handler: It is up to you how you manage the memory allocated for iTrapData.
If you allocate a specific address to save a given register --- for example, register s0 is always
saved in Addr[iTrapData]+4 --- then your handler is not re-entrant.
You cannot enable interruptions while you are handling an interruption because doing so could cause the first
value of s0 that you had saved to be overwritten.
Re-entrant handler: An elegant solution to create a re-entrant handler is to implement a stack in the
memory area reserved for iTrapData.
The solution would have to handle an interrupt stack pointer, also called a kernel stack pointer (ksp). Each time an interruption occurs, the handler must
allocate space in this stack for a new interruption frame by updating the ksp
before interruptions are re-enabled. Once space is reserved in the interrupt stack to save the registers that the
handler will use, then interrupts can safely be re-enabled. In this case we have a re-entrant handler.
It would be difficult to create a set of tests to determine if a handler is re-entrant. Therefore, in this lab we do not require the implementation of a re-entrant handler. It is acceptable to keep interruptions disabled while an interruption is being processed.
Keyboard & Display
Use the Keyboard and Display MMIO Simulator, available under the
"Tools" menu in RARS, to interact with the simulator. The display section is where
the dungeon game will be displayed, and the keyboard section is where the player will type
to move the agent and attack.
Don't forget to click "Connect To Program" before running the program.
Generally, devices have two registers associated with them, a control and a data
register. A description of the control
and data registers for the keyboard and display can be found in the
Memory-Mapped IO section. As an example, the display device has a Display control register at memory address 0xFFFF0008 and a Display data register at memory address 0xFFFF000C.
These registers are located in memory (hence the name "memory-mapped IO") and must be accessed indirectly using load and store instructions.
The control register relays information about the device's state, and
the data register relays data to or from a device.
A separate keyboard interrupt occurs for every key pressed when the keyboard interrupts are enabled. Therefore, the user program receives one character at a time.
Timer
In RISC-V, timing functionality is managed by the timing hardware thread. The timing hardware thread
maintains the time asynchronously and allows the program to raise
an interrupt at a specific time. To do this the core keeps track of the time in
the 64-bit register time which holds the current time (in milliseconds)
since the program started. To generate a timer interrupt at a specified time,
the value in the register timecmp must be set.
For example, say register time contains value 0x000004B0 (1200 ms), and
register timecmp contains value 0x000005DC (1500 ms).
Assuming timer interrupts are enabled, a timer interrupt would be raised in 300 ms when
the value in time equals the value in timecmp.
If you wish to have timer interrupts occur at a regular interval, then after every timer interrupt
the value in the timecmp register must be updated.
To simulate RISC-V timing functionality,
use the Timer Tool under the "Tools" menu in RARS. Don't forget
to click "Connect To Program" and "Play" before running the program. The timer tool does not
need to be reset each time you run the program, you can leave it running between program
executions.
Memory-Mapped IO
Memory-mapped IO allows interaction with external devices through an interface pretending to be system memory. This mapping allows the processor to communicate with these devices using the load-word and store-word instructions. Here are the memory mappings and descriptions of important I/O registers for this lab:
| Register | Memory Address | Description |
|---|---|---|
| Keyboard control | 0xFFFF0000 |
For keyboard interrupts to be enabled, bit 1 of this register must be set to 1; after the keyboard interrupt occurs, this bit is automatically reset to 0. |
| Keyboard data | 0xFFFF0004 |
The ASCII value of the last key pressed is stored here. |
| Display control | 0xFFFF0008 |
Bit 0 of this register indicates whether the processor can write to the display. While this bit is 0 the processor cannot write to the display. Thus, the program must wait until this bit is 1. |
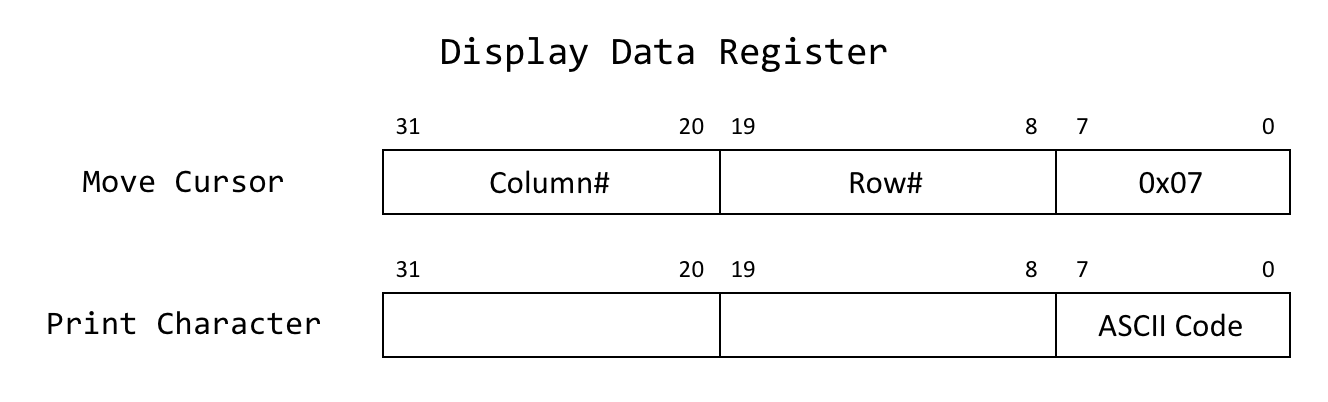
| Display data | 0xFFFF000C |
When a character is placed into this register, given that the display control
ready bit (bit 0) is 1, that character is drawn onto the display. If the
character is the bell character (ASCII code 0x07) the display will
move the cursor and the bits 8-19 and 20-31 correspond to the row and column
respectively.You should not have to work with this register directly in this lab, as the mechanics of printing to the MMIO display are handled by the printChar
and printStr functions that are provided to you. |
| Time | 0xFFFF0018 |
This is a read-only register that holds the time since the program has started in milliseconds. |
| Timecmp | 0xFFFF0020 |
When the user-specified value in this register is less than or equal to the value in the time register an interrupt is generated. Writing to this register is required to set up a timer. |
The layout of the data display register is shown in the following graphic:
Programming Constraints
You cannot use reading or printing system calls (ecall) in
this assignment.
Instead, the program must use the MMIO and interrupts to interact with
the keyboard and the display.
When executing a program in RARS using your custom handler, runtime errors
won't be shown in RARS as usual. Instead, you are provided a section of the handler labelled handlerTerminatethat
will print the line where an error occurred, and the error code.
For example, the following exception happened at the instruction at
address 0x00400f70 and was caused by a load access fault.
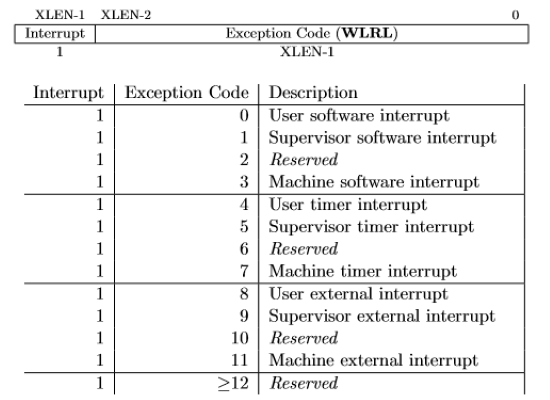
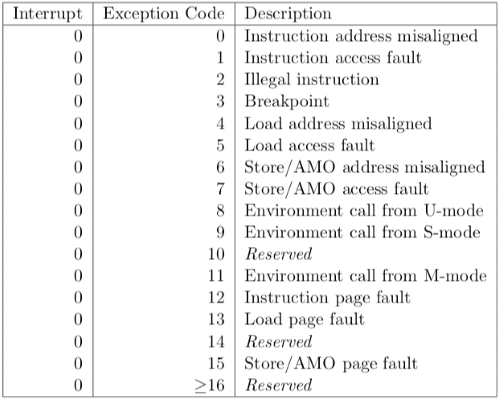
Error: Unhandled interrupt with exception code: 0x00000005
   Originating from the instruction at address: 0x00400f70
Use the tables below to identify errors.
Make sure the handler does not call any functions. This is because the handler is not a function and hence it
must
restore every register that it uses, even the temporary t and a registers. On the other hand,
functions are
not required to preserve t and a registers, only the s registers.
Dungeon Crawler
This section describes the technical details of the Dungeon Crawler game.
In order to implement this game, your program must be able to read keyboard
input from the user, print the state of the game as output, and manage a
timer.
User input must be read by handling keyboard interrupts, and output must be
printed to the Keyboard and Display MMIO Simulator (output will
not be printed to the RARS console).
The MMIO display terminal simulates an external display device and gives
RISC-V assembly programs running in RARS the ability to print characters
through memory-mapped IO.
The Dungeon Crawler game requires the following functionality:
- Creating a 2D array to hold the dungeon structure. This array contains the positions of paths, loot, and enemies.
- Drawing to the MMIO display the dungeon map, the player, and all other game elements.
- Handling keyboard interrupts to move the agent and attack enemies.
- Handling timer interrupts to keep track of the remaining time.
- Implementing the game logic for encounters between the agent and loot, and the agent and enemies.
- Implementing the game logic for winning and loosing the game.
The following sections describe this functionality in detail.
Creating the Dungeon Map
Loading a Dungeon
The structure of a dungeon is defined within a text file that is passed to the program as a program argument:
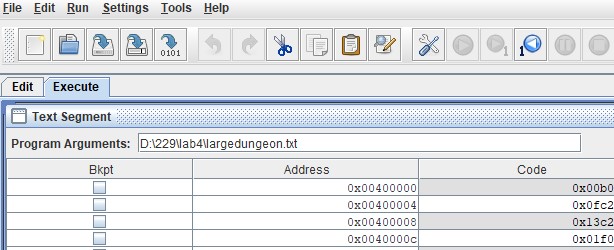
The input dungeon file is read and parsed for you by the code in common.s.
All required information about the dungeon's structure will be provided to
your program by common.s.
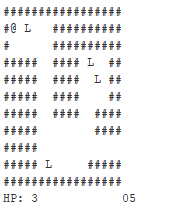
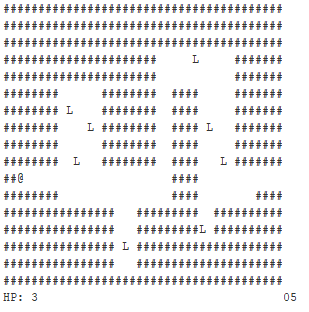
We have provided three test dungeon maps in the Tests/
directory: smalldungeon.txt, mediumdungeon.txt,
and largedungeon.txt.
The respective output of each dungeon on the MMIO display at the start of
gameplay is shown below:

Structure of the Dungeon
A dungeon is a grid of cells.
Each cell is described by its x, y coordinates.
The top-left of the dungeon has coordinates \((0, 0)\).
The size of the dungeon is determined by the coordinate of the cell on the
lowest-right corner of the grid.
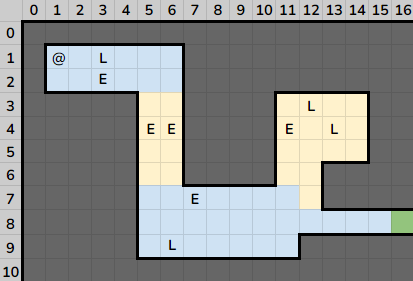
The following diagram is mapped from the dungeon in mediumdungeon.txt.
The lowest-right coordinate of this dungeon is
\((24, 12)\), so the dungeon is 25 by 13 grid.
The size is larger than the lowest-right coordinate because indices in the
grid start at 0.
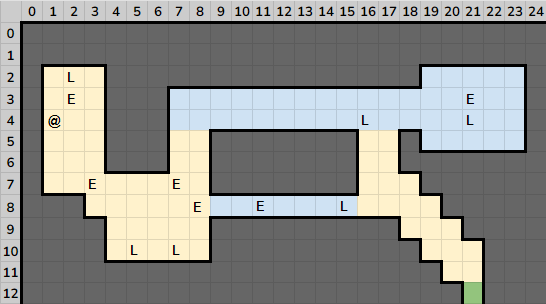
The dungeon's structure can be imagined as an underground network of paths that have been carved through solid stone, with only a single exit. Each path is a contiguous line of cells that the agent can walk on. Paths must be horizontal (running left to right) or vertical (running top to bottom), and each path is described by its starting and ending cells.
Each blue row of cells in the image above represents a horizontal path (ex.
\((7, 3)\) to \((23, 3)\)).
Each yellow column of cells represents a vertical path (ex.
\((1, 2)\) to \((1, 7)\)).
The green cell represents the dungeon's exit point.
The path coordinates are mapped directly from mediumdungeon.txt.
The path configurations are determined in mediumdungeon.txt;
there can be many configurations of mediumdungeon.txt that
create the same dungeon, so whether a path is horizontal or vertical is an
arbitrary choice made during the creation of an input dungeon configuration
file.
The enemies are shown in the above image for the purpose of
showing their positions, but in the actual game they should be hidden until
encountered during gameplay.
Data Structures
Your program's primary function, dungeon, will be passed
pointers to the following data structures:
pathArray
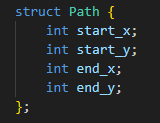
The pathArray is an array of path structures.
Each path is be defined by four integers - start x coordinate,
start y coordinate, end x coordinate, and
end y coordinate.
Since each integer is represented by a single word, the path structure is
four words long.
Paths are guaranteed to be either horizontal or vertical.
The start and end points of a path are included in the path.
You will be given an array of "path structs" where each struct can be imagined as this C struct:
Consider the following slice of a path array from smalldungeon.txt (shown above):

This slice represents the following two paths:
- \((5, 9)\) to \((11, 9)\)
- \((5, 3)\) to \((5, 6)\)
The following properties are guaranteed to hold for any path:
-
Start
x<= Endx -
Start
y<= Endy
Let P.start_x represent the x coordinate of the
start point of any given path P.
We define P.end_x, P.start_y
and P.end_y similarly.
Then any given cell in the entire dungeon with co-ordinates (x,
y) is part of a path if and only if there exists a
path P such that both of the following conditions hold:
P.start_x <= x <= P.end_xP.start_y <= y <= P.end_y
A pointer to the pathArray and the number of paths are passed as arguments
to the primary function (dungeon) in your solution file.
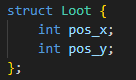
lootArray
The lootArray is an array of structures, each with the position
of a loot item.
The position of each loot item is defined by two integers -
the x coordinate and the y coordinate.
Since each integer is stored in one word in memory, the entire structure is
stored in 2 words.
You will be given an array of "loot structs" where each struct can be imagined as this C struct:
Consider the following slice of a loot array
from smalldungeon.txt:

This array represents the positions of two loot items:
- \((3, 1)\)
- \((6, 9)\)
The following properties are guaranteed to hold:
- Loot positions will always overlap with a path.
- Loot positions will not overlap with the starting point, the exit point, or any enemy.
- There can be at most a single piece of loot in any position.
A pointer to the lootArray and the number of loot are passed as arguments to
the primary function (dungeon) in your solution file.
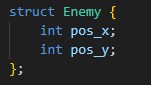
enemyArray
The enemyArray is a word array containing enemy coordinates.
The position of each enemy is defined in the same way as the loot.
You will be given an array of "enemy structs" where each struct can be
imagined as this C struct:
Consider the following slice of an enemy array from smalldungeon.txt:

This array represents the positions of two enemies:
- \((3, 2)\)
- \((5, 4)\)
The following properties are guaranteed to hold:
- Enemy positions will always overlap with a path.
- Enemy positions will not overlap with the starting point, the exit point, or loot.
- There can be at most a single enemy in any position.
A pointer to the enemyArray and the number of enemies are passed as
arguments to the primary function (dungeon) in your solution
file.
Global Variables
This section uses above diagram is, from smalldungeon.txt, as an example.
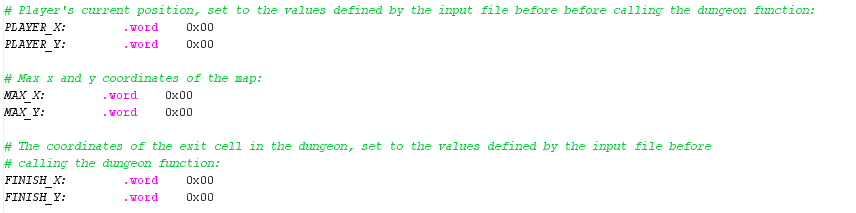
Your solution will have access to the following global variables:
Position of the Agent
The position of the agent is stored in the PLAYER_X
and PLAYER_Y variables.
At the start of the game, these variables hold the initial position of the agent.
You must update these variables with the new location of the agent whenever
the agent moves.
Exit Point
The coordinates of the dungeon's exit point are defined as global
variables: FINISH_X and FINISH_Y.
MAX_X and MAX_Y
The maximum (inclusive) x and y coordinates of the
dungeon are given in the MAX_X and MAX_Y
variables.
All paths, loot, enemies, and the finish point are guaranteed to fit within
the maximum coordinates.
Only the time remaining and the agent's health points should be drawn
outside of the dungeon.
Building the Map in Memory
Every time the player presses any of
the w, a, s, or d keys
to move the agent to a new position, the content of that position must be
checked.
You will need to check the content of a cell frequently throughout your
game.
An ideal way to do this is to combine the data from the paths, loot, and
enemy arrays into a single two-dimensional array.
You will create mapArray — a single 2D array that
represents the dungeon map.
Each element in mapArray is an integer.
The following list maps integers to their meaning
within mapArray:
- 0: Wall
- 1: Path
- 2: Loot item
- 3: Hidden enemy
- 4: Exposed enemy
For example, suppose that the dungeon cell at coordinates \((3, 2)\) contains
a hidden enemy.
Therefore, mapArray must have a '3' at element \((3, 2)\).
This array will be updated throughout the game.
For example, when the player collects loot at a particular coordinate, the
'2' at that corresponding array element should be replaced with a '1'.
You must build the array before the start of the main game loop.
A pointer to an (empty) mapArray is provided to your program's primary
function: (dungeon).
mapArray will initially be filled with zeros, your solution must correctly
build it.
Memory Layout
The mapArray is stored using row major order into a
continuous memory space.
The following video shows this transformation for a 3 by 5 grid:
Adding a Path
To add a path to the map array, simple set each coordinate
of mapArray that belongs to the path to 1.
The following video shows the creation of a sample path:
Example mapArray
Here is a subset of the mapArray
from smalldungeon.txt:
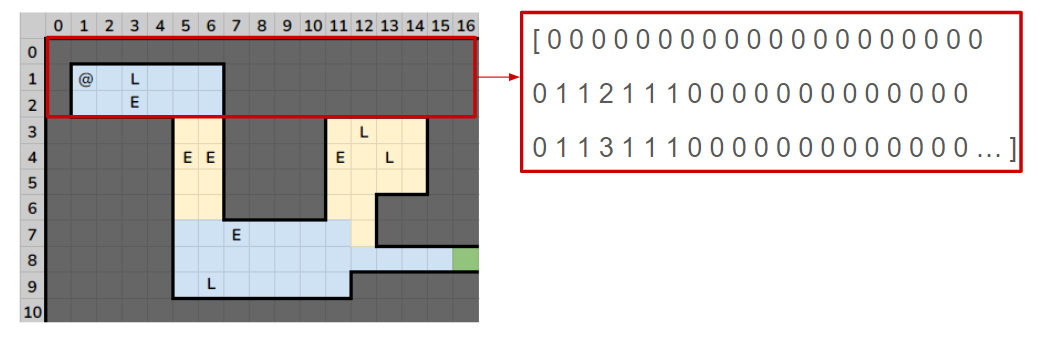
The position of the player is not given
in the mapArray.
Drawing the Map
The game will execute in a loop that draws to the display when there is an interrupt caused either by valid keyboard input or by the timer. Every time the agent moves to a new position in the dungeon, or encounters an enemy, the map must be redrawn to reflect the change in the game state.
One way to do this is to redraw the entire map element by element every time the game state changes; however, this method can become slow at larger map sizes. Instead, we can only redraw the section of the map that has changed after each action taken by the agent. This method provides smoother gameplay, but is more complex to implement.
You are free to implement map redrawing using either approach. Reasonable slowness on large map sizes will not affect your grade for this lab.
Graphics
Each element in the dungeon is printed with a specific character, given in the following table:
| Object | Character |
|---|---|
| Wall | '#' |
| Path | ' ' (Space) |
| Loot | 'L' |
| Exposed Enemy | 'E' |
| Agent | '@' |
There is no character for hidden enemies, as hidden enemies should not be drawn.
You must also print the agent's health points, and the amount of time
remaining.
Both agent's health and the remaining time must be printed in the
row directly below the last row of the dungeon.
The agent's health is printed starting at the leftmost column as
HP: X, where X is the number of health points
remaining.
The time remaining is printed starting at the
column directly to the right of the last column of the
dungeon. The time is printed as XX, where XX is
the time remaining.
If the time remaining only has a single digit, the first digit must be
zero.
This is shown in the following graphic:
Helper Functions
We have provided two helper functions, printChar
and printStr that can be used to print characters/strings to
the MMIO display:
printChar
  Prints a single character to the Keyboard and Display MMIO Simulator terminal
  at the given coordinates.

  Arguments
    a0: The x coordinate of the point to print to.
    a1: The y coordinate of the point to print to.
    a2: The ASCII representation of the character to print.

  Returns
  N/A
printStr
  Prints a string to the Keyboard and Display MMIO Simulator terminal at the
  given coordinates.

  Arguments
    a0: The x coordinate of the starting position to print the string.
    a1: The y coordinate of the starting position to print the string.
    a2: The address of the null-terminated string to print.

  Returns
    N/A
Gameplay Details
This section describes the gameplay mechanics that must be implemented.
Movement
Pressing the w, a, s,
or d keys moves the agent up, left, down, or right respectively.
Each key causes the agent to move one position in the given direction.
If the player attempts to move to a position that contains a wall, the agent
will not move.
The space key is used to attack an exposed enemy.
Any key that is pressed will generate a keyboard interrupt and must be handled by the handler.
Pressing any key that is not specified in this game should cause no change
to the status of the game.
The details of how to handle keyboard interrupts are explained in
the interrupts section.
Encountering Enemies
The agent encounters an enemy when the agent attempts to move to a position
that contains a hidden enemy.
When an encounter occurs, the enemy will appear on the map as an 'E', and
the agent will be stuck in place.
In the mapArray the hidden enemy element (3) must be replaced
with the visible enemy element (4).
Attacking
After the agent encounters an enemy, the only action the player can take is
to attack the enemy by pressing the spacebar.
All other keys should be ignored when the game is in this state.
The agent loses one health point per second until the enemy is defeated.
Once the player presses the spacebar, the enemy disappears from the map.
The shown enemy element (4) in the mapArray must be replaced
by a path element (1).
After the enemy has been attacked, the agent will become unstuck.
The following video shows an encounter with an enemy. First, the agent attempts to move onto the position that contains a hidden enemy. The agent becomes stuck, and takes 1 point of damage each second. The player then presses the space bar, and the enemy disappears. The agent is then free to move.
Time
The player starts the game with five seconds remaining on the timer. The timer ticks down once every second, and the game ends once the timer reaches 0. The details of how to handle timer interrupts are explained in the interrupts section.
Health Points
The player starts the game with three health points. If the agent encounters an enemy and is unable to attack it before the next timer interrupt, the player will lose a health point. For every second that the agent remains next to an enemy, the player will lose another health point. The game will end if the player reaches 0 health points.
Collecting Loot
When the agent moves to a position containing loot, five more seconds are
added to the timer.
The loot is then removed from the map; the loot element (2) must be replaced
by a path element (1) in the mapArray.
Ending the Game
The game can end in the following ways; the agent can reach the end of the
dungeon, the agent can run out of time, and the agent can run out of health
points.
In all cases, to exit the game, simply return from your dungeon
function.
Writing your Solution
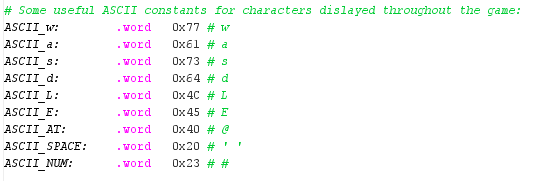
The following lines appear in the .data section of
common.s:
You may add any other global variables in your dungeon.s file
that you need to write your solution.
The following variables
in common.s are provided for your convenience.
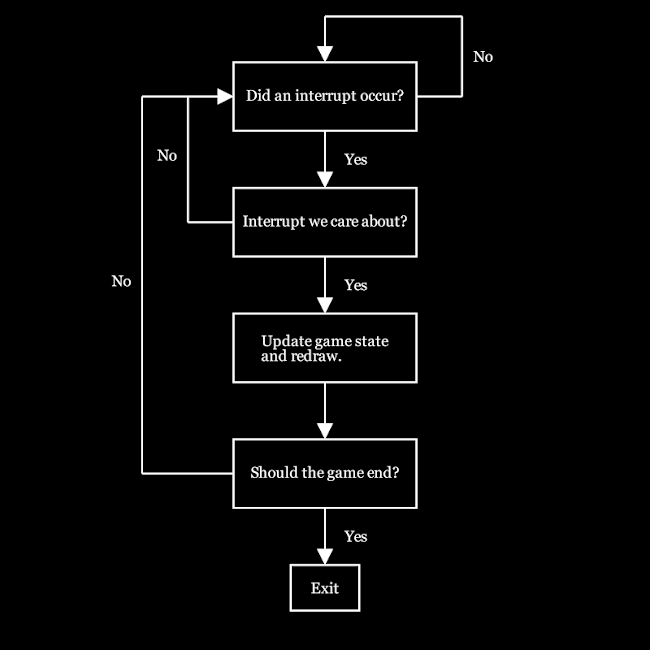
Loops and Flags
The main game loop includes updating the game state and redrawing the map;
the loop should only be executed once an interrupt that changes the state of the game
occurs.
The game only responds to w, a, s,
or d (lowercase), and spacebar keyboard
interrupts, as well as timer interrupts.
A large portion of the game time may be spent idly waiting for an
interrupt.
Interrupts can pause your program at any point during its
execution as long as they are enabled.
When an interrupt that changes the state of the game occurs, the handler
must provide information to the game loop.
This mechanism can be implemented by using global variables that act as
flags; a flag can be anything that is used to represent a certain state
or condition within the program. When an interrupt occurs, the handler
can set any number of flags to pass information to the game loop.
After the handler exits, the game loop can read the cause of the interrupt
and change the game state accordingly.
After the game has successfully responded to an interrupt, it must
reset the corresponding flag to its default state so that a new interrupt can
use it to pass information.
Hints
- Prolonged use of the MMIO simulator and the timer tool in RARS can cause them to slow down over time --- this is likely a performance bug in the implementation of RARS. The MMIO simulator may respond slowly to inputs, and the timer may pause/jump unexpectedly. Restarting RARS should fix these issues.
- It may be helpful to implement handler functionalities in a separate test file first before combining it with the rest of the game. For example, writing a program that only prints a decrementing timer to the screen and does nothing else.
- Because an enemy only appears once the agent attempts to move to the point where it resides, the agent will only be able to see at most one enemy at a time.
-
Test your solution using all of the provided dungeon
configuration files; however, it is easiest to begin the lab
with
smalldungeon.txt. You can also create new test maps using the format of the three provided maps as examples.
Assignment
Write assembly code for the following functions in the file named dungeon.s:
dungeon
  This function is the entry point of the game and it executes the main gameplay
  loop.

  Arguments
    a0: Pointer to pathArray in the format specified here.
    a1: Number of paths in pathArray.
    a2: Pointer to lootArray in the format specified here.
    a3: Number of loot in lootArray.
    a4: Pointer to enemyArray in the format specified here.
    a5: Number of enemies in enemyArray.
    a6: Pointer to mapArray

  Returns
    N/A
handler
  Handles all interrupts and exceptions. This handler should catch and handle
  keyboard and timer interrupts. A block of code handlerTerminate is provided.
  handlerTerminate prints a debugging message.

  Arguments
    N/A

  Returns
    N/A
The handler is not like a regular function
and should never be called with the instruction jal ra, handler.
Instead the address of the handler should be stored in
the utvec control status register (CSR #5) at the start of the
program.
When an interrupt is raised, the execution of the program jumps to the
instruction address stored in utvec.
Only keyboard and and timer interrupts
should be handled by your interrupt handler.
For all other interrupts, your handler should call the
provided handlerTerminate function.
This function prints the interrupt code and the address of the instruction
that caused the interrupt.
buildPaths
  Given a list of paths, this function adds the integer representation of each
  path to mapArray.

  Arguments
    a0: Pointer to pathArray in the format specified here.
    a1: Number of paths in pathArray.
    a2: Pointer to mapArray

  Returns
    N/A
buildLootOrEnemies
  This function adds the integer representation of loot and hidden enemies to
  mapArray. This function adds either loot or enemy elements into mapArray
  depending on the input arguments. The code to add loot and enemies is nearly
  identical, so it is combined into this one function. Therefore, this function
  should be called twice before the start of the game.

  Arguments
    a0: Pointer to either lootArray or enemyArray, in the formats specified here or here.
    a1: The number of loot in lootArray or the number of enemies in enemyArray.
    a2: The integer representing either loot or hidden enemies (2 for loot, 3 for hidden enemy)
    a3: Pointer to mapArray.

  Returns
    N/A
displayDungeon
  This function prints the contents of mapArray to the MMIO display. After this
  function is called, the entire contents of mapArray should be shown on the
  MMIO display. Depending on how you handle redrawing the map in your game, you
  may call this function only once at the beginning of the game or multiple
  times throughout the game.

  Arguments
    a0: Pointer to mapArray.

  Returns
    N/A
getDestination
  This function returns what type of element is located at a given x,y point in
  mapArray.

  Arguments
    a0: The x coordinate of the point to check.
    a1: The y coordinate of the point to check.
    a2: Pointer to mapArray.

  Returns
    a0: 0 if the point is a dungeon wall
        1 if the point is a path
        2 is the point is loot
        3 if the point is a hidden enemy
        4 if the point is a shown enemy
replacePoint
  This function replaces the value at a given x,y point in mapArray with a new
  value.

  Arguments
    a0: The x coordinate of the point to replace.
    a1: The y coordinate of the point to replace.
    a2: Pointer to mapArray.
    a3: The new value to store at the point.

  Returns
    N/A
In addition to the printChar and printStr
functions, we have provided the following helper functions:
intToStr
  Converts at most a two digit integer into its ascii equivalent. The lower two
  bytes of the return contain the ASCII characters corresponding to the digits
  in the integer while the upper two bytes are guaranteed to be zero. If there
  is only one digit, then the number in the 10's should be a 0. As an example,
  if the input a0=13 at the start, then intToStr returns a0=0x00003331.

  Arguments
    a0: The integer that is to be converted to a string.


  Returns
    a0: The ascii characters corresponding to the integer in the lower two bytes.
Write additional functions as needed. The result of unit testing are displayed to the standard output. The program only provides unit testing for a small portion of the game functionality due to the nature of the program. It's very important that you do your own testing to ensure the game runs and behaves properly. Code from course materials can be used in the solution as long as the source is acknowledged.
Understanding printChar, printStr, and waitForDisplayReady
The MMIO display is not always ready to print a new character.
Thus, whenever the printChar function is called, it
must wait for the MMIO display to be ready before it can print.
printChar calls the function
waitForDisplayReady which executes a busy wait loop that
checks the status of the Display Control Register. This register
acts as a flag that signals if the display is ready. The addres
of this register is in the global variable
DISPLAY_CONTROL provided to you. If the value in the
Display Control Register is set to 1, then the busy wait loop
exits and the character/string can be printed to the MMIO display.
Otherwise, the loop will continue periodically checking the
register.
This flag/idle loop mechanism is necessary because the MMIO simulator temporarily clears the Display Control register while printing a character to the display and then re-enables it once printing is complete. The sequence followed during this process is as follows:
- When data is written to the Display Data register, the simulator is notified.
- The Display Control register is cleared by the simulator.
- The character is read from the Display Data register.
- The ASCII character is echoed to the display.
- A delay is introduced to simulate the processing time required by an actual display unit.
- Finally, the simulator re-enables the Display Control register.
PrintStr simply calls printChar in a loop.
displayDemo.s in Code/Demo/ may be helpful
for testing printing to the Keyboard and Display MMIO Simulator
display.
Marking Guide
Assignments too short to be adequately judged for code quality will be given a zero.
-
20% For proper implementation
of
buildPaths(8%)buildLootOrEnemies (Loot)(4%),buildLootOrEnemies (Enemies)(4%),replacePoint(2%),getDestination(2%). - 15% For proper timer behaviour
- 45% For proper gameplay behaviour
- 20% For code cleanliness, readability, and comments
- Here is the MarkSheet used for grading
Submission
There is a single file to be submitted for this lab: dungeon.s
The file dungeon.s should contain the code for both the interrupt
handler and the functions listed above, plus any helper functions you may
have added.
- Do not add a
mainlabel to this file - Do not modify the line
.include "common.s" - Keep this file in the
Codefolder of the git repository