Creator: Zixu (Andy) Yu
Image blurring is a common technique used to hide or obscure an image. It distorts the details of an image, making it less clear.
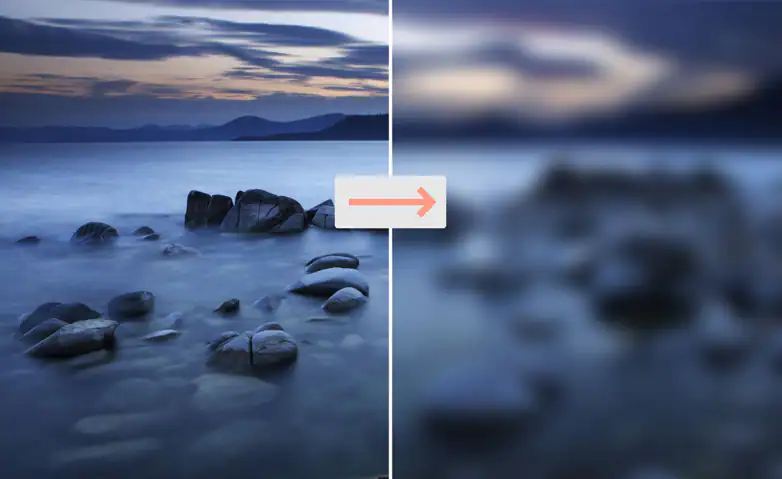
A shape can be identified due to its edges. To blur it, we can reduce the clarity of an edge and make the transition from one pixel to another more smooth.
This lab uses box blur, also known as a box linear filter. It will apply a filter in which
each pixel in the resulting image has a value equal to the average value of its neighboring pixels in the input
image. A 3 by 3 box blur ("radius 1") can be represented with the following matrix:
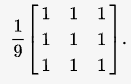
The radius can be calculated as matrixSize / 2 (floor division). For example, a 5 by 5 box blur has a radius of 2.
This lab uses the PPM image format because in this format RGB values are stored as ASCII characters, which makes it very easy to manipulate. To view a PPM image on your machine, try to use this link. The picture below explain how a PPM file is structured if we open it as a text file.
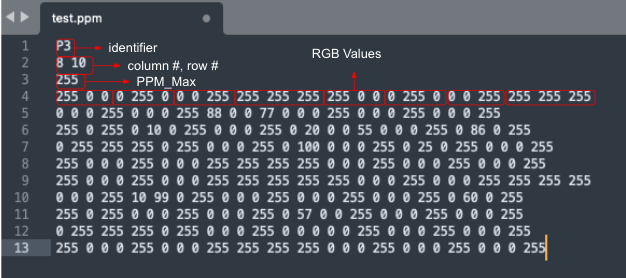
The "P3" identifier on the first line, and the value of 255 on the third line are required.
A PPM file begins with an identifier has the following format:
For a PPM image, each pixel value is listed as the values of its three components, Red, Green and Blue. These values are represented as ASCII characters in the memory in RISC-V. A whitespace (i.e., typically a space or newline character) must separate these integers. The file can have any number of values on each line. For example, it is possible that the file has all the pixel values (R, G and B, separated by spaces) on a single line.
The goal of this lab is to write a program in RISC-V that will blur an image provided.
You must write the following functions digitToAscii,
copy, asciiToDigit, readNextNumber, pixelKernelMul,
storeNumber, blurImage with the specifications discussed later.
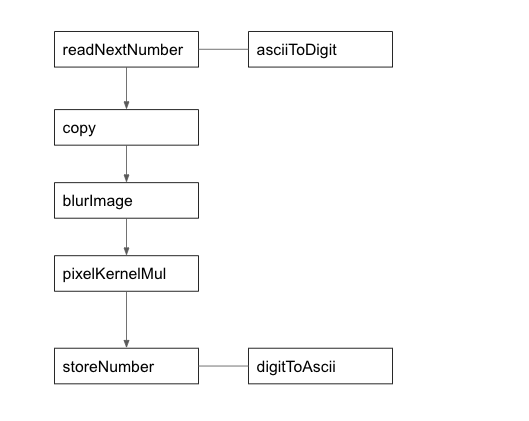
The code provided in common.s operates as follows:
readNextNumber which uses asciiToDigitto convert each ASCII string into an integer value.
copy to make an in-memory copy of the values. This copy will be used to computed the color values for the blurred image.blurImage which uses pixelKernelMul to blur the image. storeNumber which uses digitToAscii to convert the blurred image back to ASCII characters.
   digitToAscii:
     This function returns the ASCII value of the digit.

     Arguments:
     a0: a single digit represented as an integer, between 0 and 9

     Return:
     a0: the ASCII value of the digit, between 48 (0x30) and 57 (0x39)
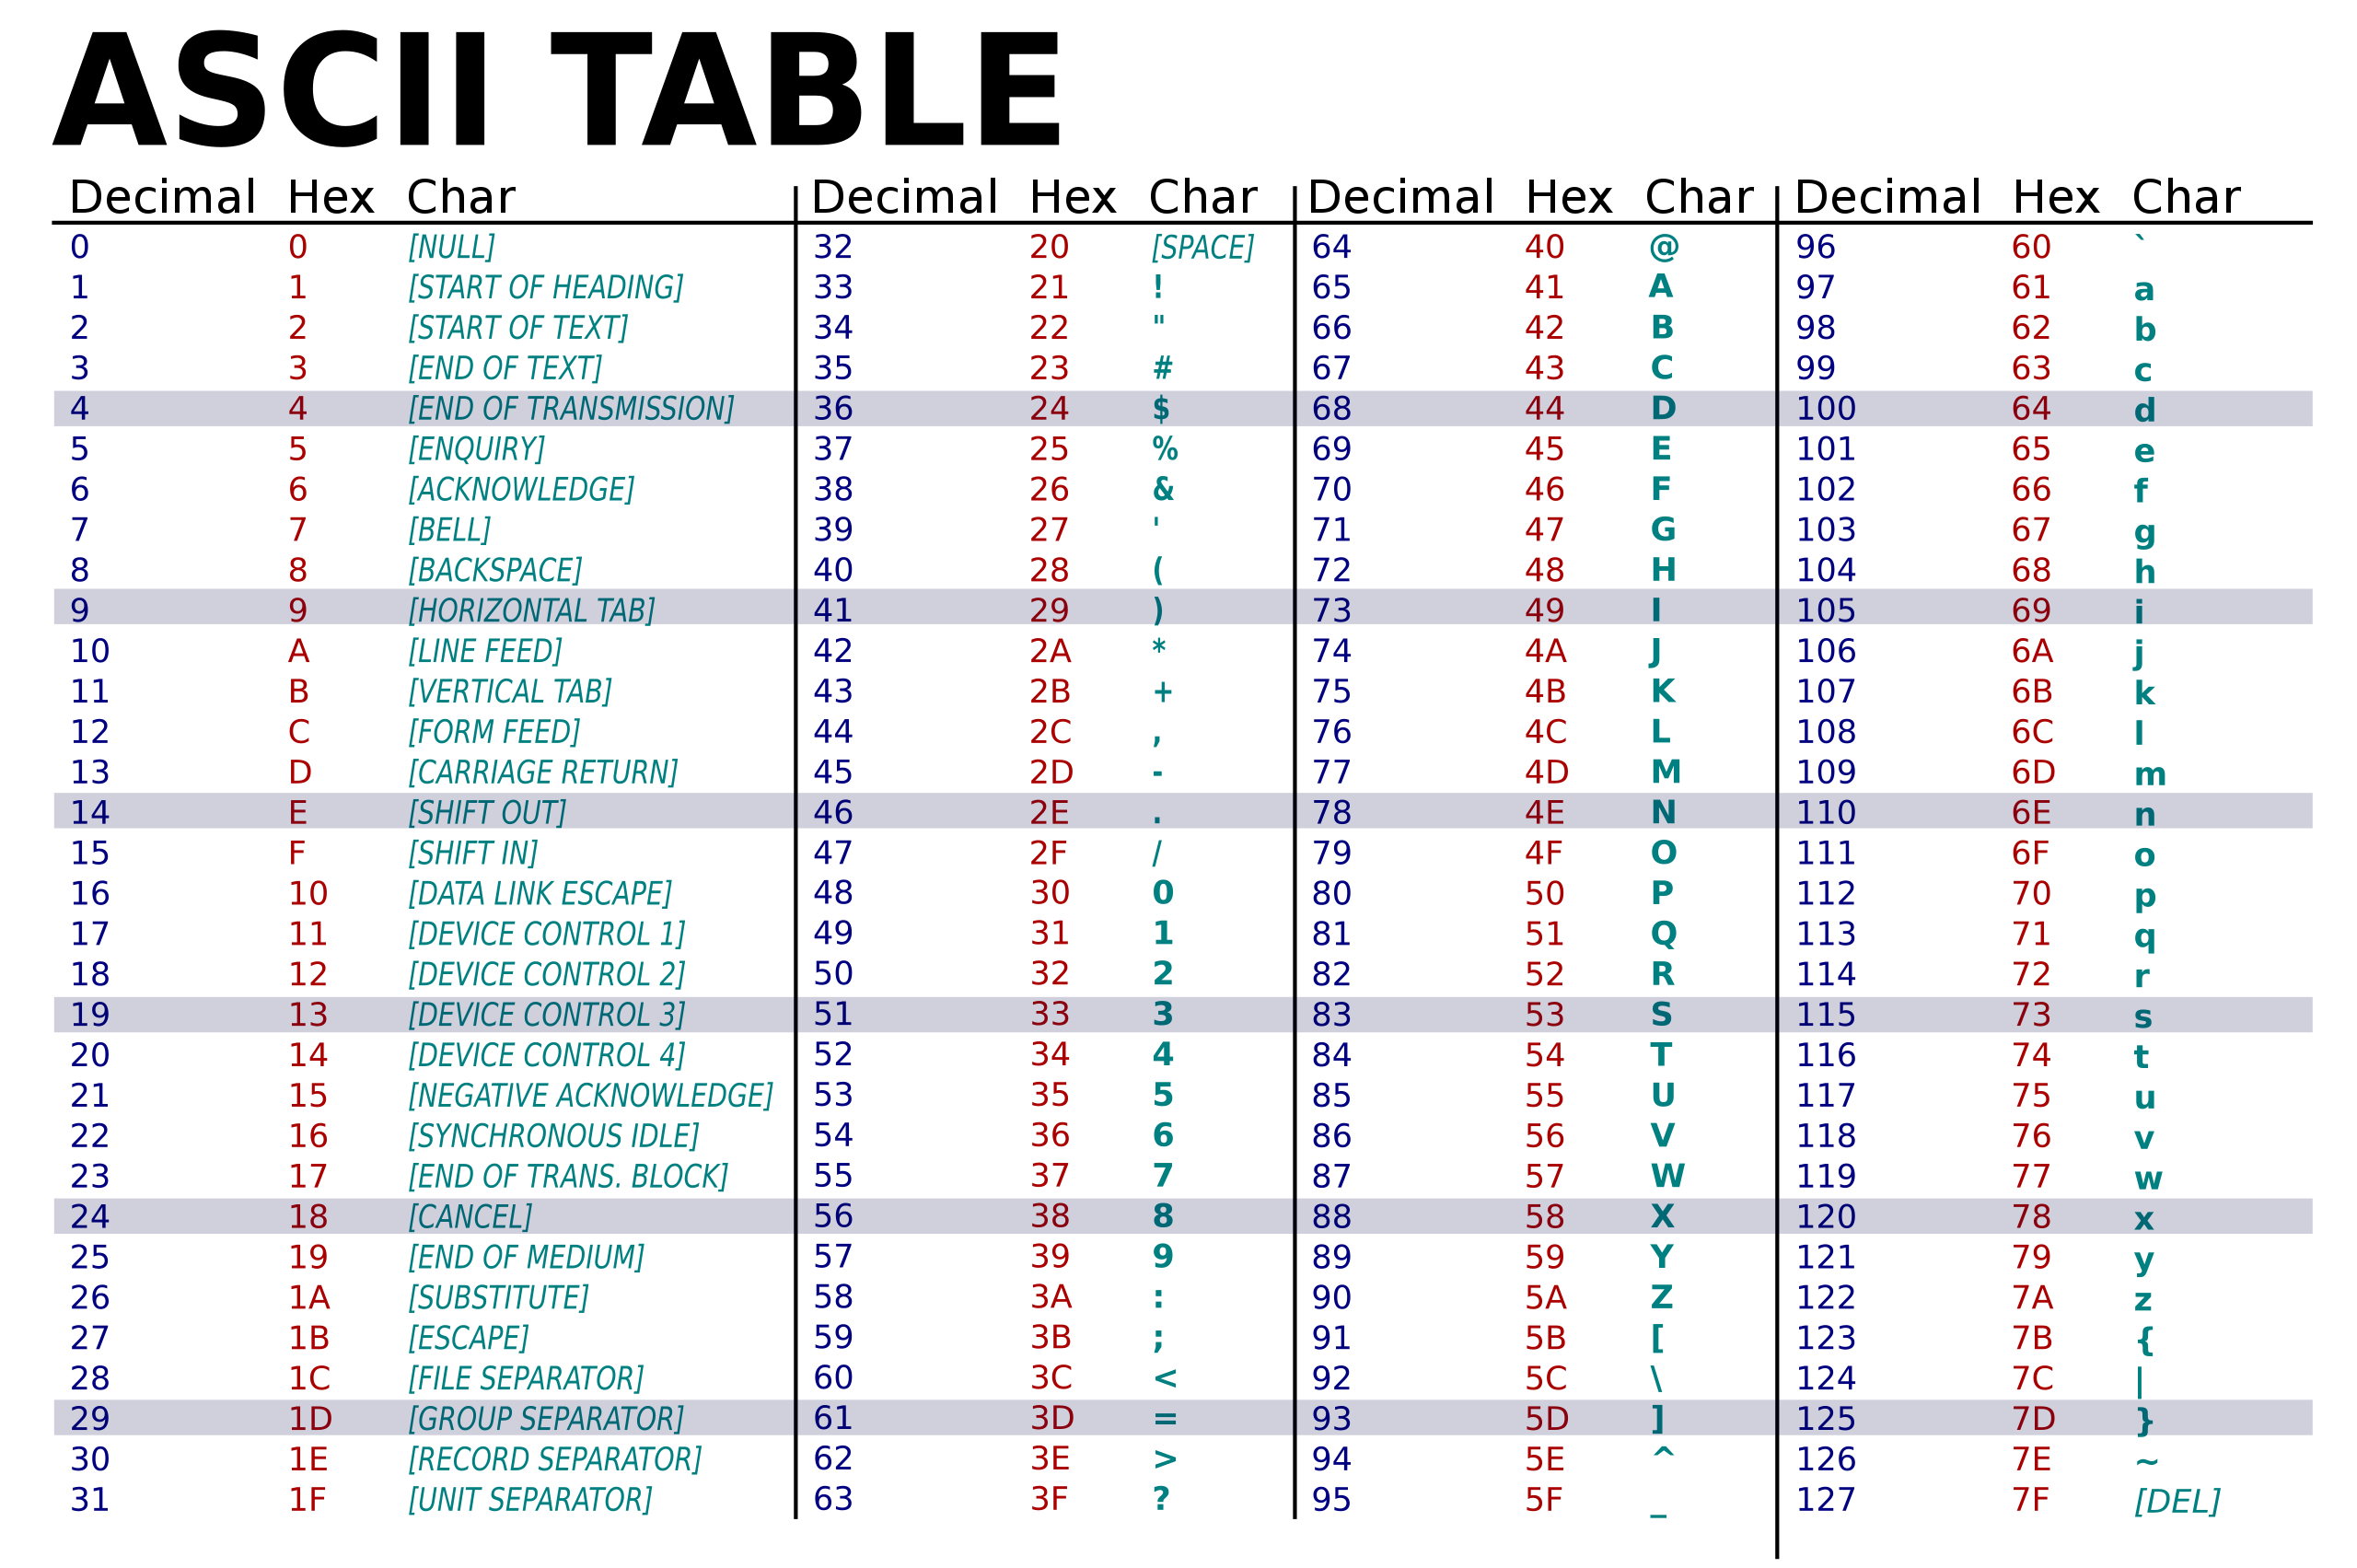
The picture below is the ASCII table. For the function above, the input will be restricted to digits (0-9).
  copy:
    This function copies all the RGB values to another address.

    Arguments:
    a0: address of the start of RGB values (where to copy from)
    a1: address of the start of where to copy to
    a2: length in words
  asciiToDigit:
    This function returns the digit for the given ASCII value

    Arguments:
    a0: the ASCII value of the digit, between 48 (0x30) and 57 (0x39)

    Return:
    a0: a single digit represented as an integer, between 0 and 9
readNextNumber reads a string of ASCII characters and converts the first number
it finds into an integer. It is guaranteed to only have ASCII numbers between 0 and 255. The function skips any whitespace before the number, then reads until it
encounters a whitespace character including:
(0x00)(0x20)(0x0A)(0x0D)(0x09)
  readNextNumber:
    This function returns the next number starting from the current address.

    Arguments:
    a0: the current address to start reading

    Return:
    a0: the address to start reading the next number
    a1: the number represented as an integer
Here are some cases to consider.
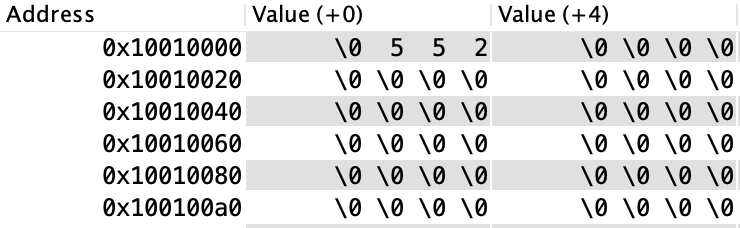
In the example above, assume the argument a0 is 0x10010000. The expected return of
a0
should be 0x10010003 and a1 should be 0x00000020 since starting at the
memory address of 0x10010000, the first digit we are getting is 3 (0x33 in hex for
ASCII), and the second digit we are getting is 2 (0x32 in hex for ASCII). Therefore, the result of
a1
is 0x20 (32 in decimal). And the next address to start reading the next number is
0x10010003 since we have already read the digit at the address of 0x10010000 (digit 3),
0x10010001, (digit 2)
and 0x10010002 (space).
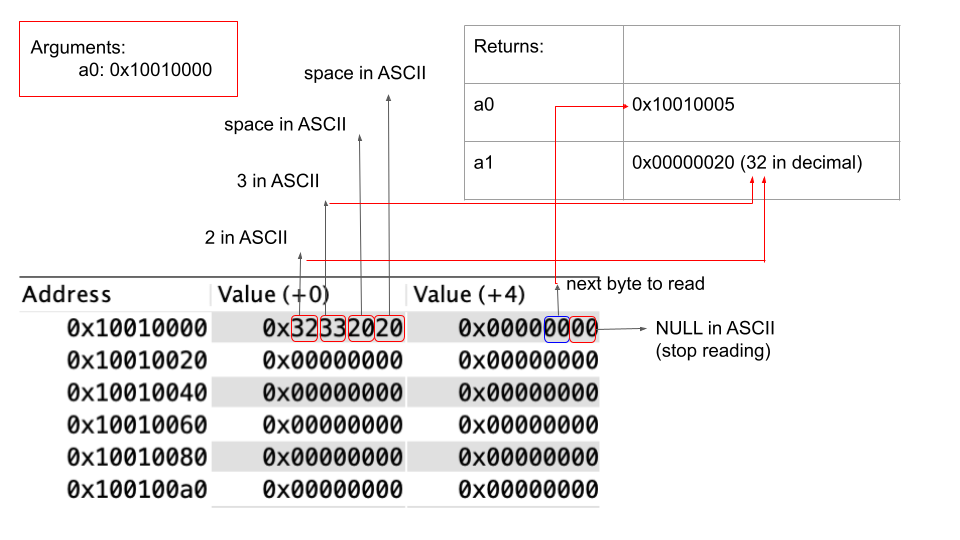
In this example, also assume a0 is 0x10010000. The expected return of a0
should be 0x10010005 since we have processed all the addresses before that. However, the return of
a1 should also be 0x00000020 (32 in decimal) since we should ignore the two spaces
(0x20) in the beginning.

In this example, the return of a0 should be 0x10010005 and a1 should be
0x00000001 since we are ignoring the leading zeros (0x30 in hex for ASCII).
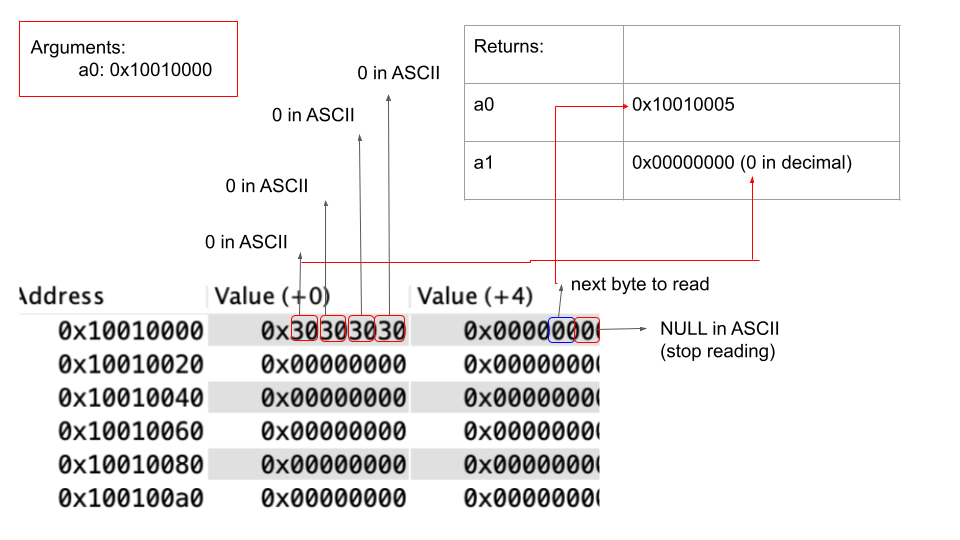
Finally, in this example, the return of a0 should also be 0x10010005 and a1
should be 0x00000000.
  storeNumber:
    This function converts an integer value between 0 and 255 to ASCII and then stores their ASCII to the address. Store the leftmost digit first, consider using the function digitToAscii.

    Arguments:
    a0: the number represented as an integer
    a1: address for the number to be stored

    Return:
    a0: the next address that's available to be stored
Assume the argument a0 is 0x000000ff (255 in decimal) and a1 is
0x10010000.
After calling the function, we should see the number is stored in the memory as shown in the diagram below.
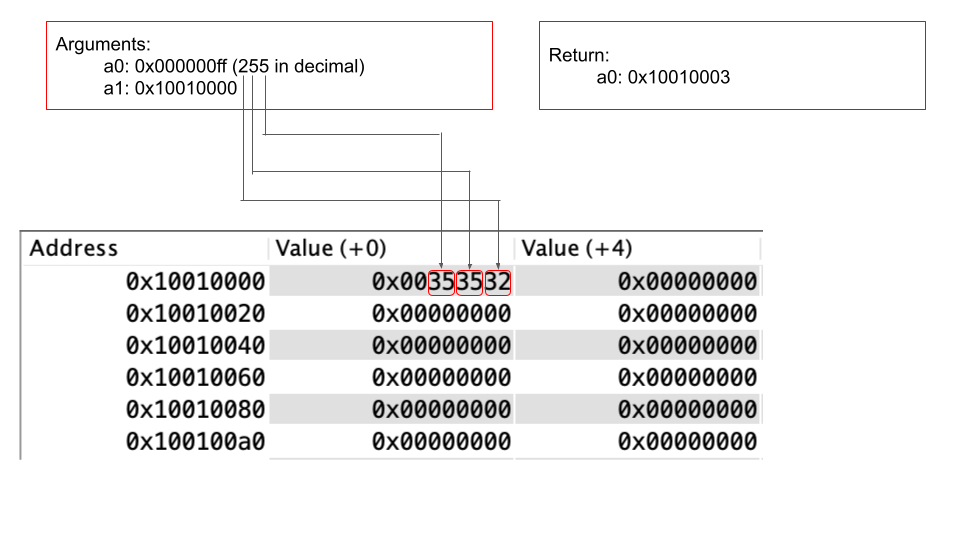
Equivalently, if we translate the hexadecimal to ASCII,
And the return of a0 should be 0x10010003 since that's the address for the next number
to be stored.
  pixelKernelMul:
    This function calculates the average for each of the R, G, B values and stores the value.

    Arguments:
    a0: address of the start of RGB values, store the calculated RGB values in this region (a0 is the base address)
    a1: address of the start of the copy of RGB values
    a2: row # of the current pixel to blur
    a3: col # of the current pixel to blur
    a4: total row (may not be used)
    a5: total col
After parsing the image file, each word in RISC-V memory represents a pixel value. Each pixel value contains 4
bytes, including R, G, B values and a placeholder(Null).
Note that each of the R, G, B values is stored as a 1-byte unsigned integer in
memory since they can only be from 0 to 255.
![]()
      +---+---+---+---+---+---+-----------+
      | 0 | 1 | 2 | 3 | 4 | 5 | ... | 255 |
      +---+---+---+---+---+---+-----------+
      | R | G | B |Nul| R | G | ... | Nul |
      +---+---+---+---+---+---+-----------+
      <-------------->
             |
          1 pixel
For the simplicity of the lab, we are only going to blur the center of the image and not deal with the corners and
edges. We are using the kernel with a radius of 3. The matrix will be a 7 (calculated from 2 × 3
+ 1) by 7 matrix (all filled by
1) and then multiply by 1⁄49. It looks like the picture below.
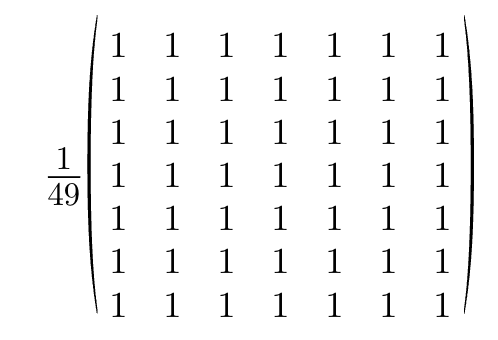
We are going to apply the filter for each of the R, G, B values separately for all pixels (except the ones on the
edges and corners). The video below explains the calculation process. We are going to take all the 49 surrounding
pixels and then calculate their average.
Do NOT modify the memory given by a1. It is a copy of the original image. Store the result of the
blur in a0.
  blurImage:
    This function blurs the image using pixelKernelMul on all possible pixels.
    It will run pixelKernelMul on all pixels except for the ones on the edges and corners.
    The C code is provided below.


    Arguments:
      a0: kernel size
      a1: total rows
      a2: total columns
      a3: address of the start of RGB values, store the calculated RGB values in this region (a0 is the base address)
      a4: address of the start of the copy of RGB values
C code for blurImage:
    const int kernel_radius = 3;
    for (int i = kernel_radius; i < row - kernel_radius; i++) {
      for (int j = kernel_radius; j < col - kernel_radius; j++) {
        pixelKernelMul(...);x
      }
    }
Notice the directive
.include "common.s" in the solution template file provided. This directive will cause RARS to execute
the code in the file common.s before executing any code in the solution.
You must follow the template exactly in blur.s by completing each function.
You can make any other helper functions, as long as they do not share a name with any labels already
used in the common.s file. Read the code in the common.s file to understand how
the whole program works.
In RISC-V assembly every function must have a return statement, this return statement is the instruction
jr ra.
You must include this instruction at the end of your function.
Return values must be stored in the argument registers.
Sample test cases are in Code/tests/. The correct outputs
for these tests are in the files with the same name but .correct.out extension.
When testing, provide the path to test file at program arguments in the RARS simulator. Alternatively, test from the terminal with
rars LABFILE pa TESTFILE where
TESTFILE is the path to the file that contains the test case that you want to test and
LABFILE is the path to blur.s. After running the program, it will check the correctness of the functions.
The check does not guarantee that the solution will receive full marks for the functions, you still need to do your own testings. The provided tests do not check the correctness of blurImage.
This function must be checked manually as discussed in the next 2 paragraphs.
The program also generates an output file (blurred image) with the same name as the test
file but with .out extension.
The Linux/UNIX command diff can be used to compare the outputs. For instance, the command diff IMAGE.out IMAGE.correct.out, where IMAGE.out is the path to
the file that contains your image and IMAGE.correct.out is the
path to the correct output image, will print the differences between the two outputs.
If diff does not print anything, then the two outputs are identical.
You are encouraged to test your functions individually.
Do NOT put anything in .data section in blur.s.
The test case test2.ppm may take up to 3 minutes to run. Thus, only
run this test case after the solution successfully executes the smaller test cases.
Code/tests/.
beqz instruction in RARS. If you find your code is buggy or
doesn’t run properly, use beq zero instead.
ebreak for debugging, remove them before submitting the lab. Do not
print anything in the file
blur.s.
ebreak lets you set breakpoints in your code. When your debugger reaches the
instruction ebreak, it will stop before the next instruction, allowing you to inspect the state of
your program. You can use this for debugging.
This lab is supported in CheckMyLab. To get started, navigate to the Image Blurring lab in CheckMyLab found in the dashboard. From there, students can upload their test cases in the My test cases table (see below). Additionally, students can also upload their `blur.s` file in the My solutions table, which will then be tested against all other valid test cases.
There is a single file to be submitted for this lab. blur.s should contain the code for your
solution.
main label to this file..include "common.s".blur.s in the Code folder of the git repository.